Creating Redhat Image using image builder and Pushing it to Google Cloud.
Red Hat Hybrid Console is a web-based management interface designed to help organizations manage their hybrid cloud infrastructure, including both on-premises and cloud-based resources. It provides a unified view of resources across multiple environments, with features such as resource monitoring, automation, and governance.
Step 1: Go to Redhat Hybrid Cloud Console
Register and login to your account in redhat and visit the URL: https://console.redhat.com/insights/image-builder
Step 2: Create Image in Redhat Image Builder
In the next step, navigate to Image Builder and click on create image. You can see the similar interface like:

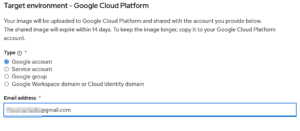
Step 3: Select Target Environment as Google Cloud Platform
Now, we have to select the target environment where we want to deploy this Operating System. It offers cloud deployment in different cloud platforms like: Google Cloud, Amazon Web Services, Azure, etc. For now, we are pushing the image to Google Cloud Platform. Then enter your email address there

Step 4: Select Activation Key in Redhat Customer Portal
You need a activation key to use this image in google cloud platform. I previously created the activation key “test”, so i will use it for now. If you donot have your activation key setup, you can create using redhat customer portal. You can directly refer to this URL to create activation key:
Step 5: Configuration in Redhat Hybrid Console
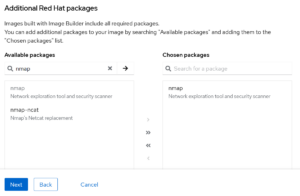
You can define here partioning. For now i will be using automatic partioning. After that you can install additional redhat packages in your system. For now, i will be installing nmap.

Step 6: Name and review
Now after giving the image name and reviewing the image you can create and you can see that the image builder is creating image for us.

Step 7: Viewing Configuration Details
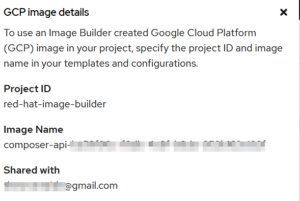
After successfull build you can see that the status of image is now changed to Ready. And on image details as: These details are required while working on google cloud.

Step 8: Setting up google cloud using google Cloud Console
In this section, we will be using google cloud shell. Make sure you have your google cloud account setup with that given email in above image builder. Activate your google cloud shell and view project list using command:
gcloud projects listThe next step is to set your project id as the default GCP project. You can do this by using the command:
gcloud config set project [project_id]It will ask you to authorize google cloud shell. Click authorize.
Now create a VM instance with the image using the command:
something@cloudshell:~$ gcloud compute instances create [image_name] --image-project red-hat-image-builder --image [image_name]In the above command image_name should be same as the image name you see while viewing the image details in image builder in redhat hybrid cloud console. I here haven’t specified any regions you can specify the region with —zone tag or simply gcloud will ask you the region while executing.
After successfull instance creation connect it and start playing. You can see the instances running by using command.
gcloud compute instances list
Step 10: Playing with Redhat Enterprise Linux (RHEL)
And you can see that we have successfully deployed redhat enterprise linux (RHEL) in our google cloud.

Checking if nmap is installed in the instance or not in RHEL?
To check if nmap package is installed in the instance we can simply run any of these commands. And we can see that the package is installed in our instance.
nmap --version
nmap -h
which nmap
In this way we can create image from redhat hybrid cloud console and deploy it in Google cloud platform.
Thanks!
Read this article below if you want automation: Setup Ansible in Your Servers
Wow superb blog layout How long have you been blogging for you make blogging look easy The overall look of your site is magnificent as well as the content