Setup Ansible in your servers
Setup ansible in two servers | Part – 1
Ansible is a popular open source software used for automation and configuration management. Agentless architecture and it’s cross platform compatibility are some features that helped it to gain large and active community.
Before setup we must be familiar with the use case of Ansible. Configuration management, infrastructure provisioning, application deployment, etc are some use cases of Ansible.
Step 1: Installing Ansible in Ubuntu
Update packages
sudo apt update
#then run
sudo apt install software-properties-common
#The software-properties-common package provides a set of utility scripts for managing software properties, such as adding and removing repositories.
After that add ansible into your repository. A PPA is a third-party repository that provides packages for a specific software or tool that may not be available in the official Ubuntu repositories. In this case, the Ansible PPA provides the latest version of Ansible for Ubuntu.
sudo add-apt-repository --yes --update ppa:ansible/ansibleOnce you have added the Ansible PPA to your system, you can install Ansible using the
sudo apt install ansibleVerify the installation using command.
ansible --versionIf you are using different distro or operating system you can refer to this document:
Step 2: Configuring ansible in your control node
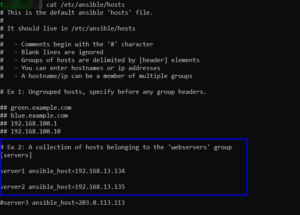
Ansible uses an inventory files to define the systems it will manage. You can edit the file /etc/hosts/
as:

Or you can simple edit the contents in the syntax:
[servers]
server1 ansible_host=<IP or hostname of the first server>
server2 ansible_host=<IP or hostname of the second server>
Step 3: Add ansible user to the servers
You can use the command to generate keys for test user.
ssh-keygenNow you can copy these keys to the server. The basic syntax to copy id’s is
ssh-copy-id username@hostYou will get similar output as shown in figure below.

Step 4: Test the connection using ping
From the control server you can ping both two servers. You can use the command to test the connection.
ansible all -m pingYou can see the output as:

To view server uptime you can use the command:
ansible all -m shell -a "uptime"You can see the output as:

You can use yaml configuration file to do some complex tasks in your servers. This can be done using ansible-playbook which will be described detail in upcoming parts.
Thanks!
Find out Redhat Image Builder Awesome Feature Here:

I think every concept you put up in your post is strong and will undoubtedly be implemented. Still, the posts are too brief for inexperienced readers. Would you kindly extend them a little bit from now on? I appreciate the post.
I do trust all the ideas youve presented in your post They are really convincing and will definitely work Nonetheless the posts are too short for newbies May just you please lengthen them a bit from next time Thank you for the post
Its like you read my mind You appear to know so much about this like you wrote the book in it or something I think that you can do with a few pics to drive the message home a little bit but other than that this is fantastic blog A great read Ill certainly be back
Wow amazing blog layout How long have you been blogging for you made blogging look easy The overall look of your web site is magnificent as well as the content